Friday, July 30, 2010

Frugal Friday - Photo Editing: Part 2

Big
I know this week was supposed to be water fun with your pictures…but I ran into a bit of technical difficulties on that front and therefore I am going to slide those fun tips back a couple of weeks.

Remember, these ideas and techniques will permanently alter your photographs. Do not try this on any photos that are one of a kind, without negative or digital back-up or are antique photos. If you would like to use an antique or one-of-a-kind photo, I suggest you scan them and reproduce them, using the reproduction to play with. This probably seems really logical; I just feel better stating it before we start…

So moving on, painting fun!

#1 Photo Tinting
One thing I like to do with my photo editing software is tinting my photographs, my software comes with a tint black, tint sepia, tint purple, tint green and so on…I thought this might be fun to try with paint.

In a small container add a small amount of acrylic paint to water, at about a 1:5 ratio, you want this to be very watery.
Photobucket

Brush the paint over the entire surface of the photograph. The paint will streak some, but just let it dry that way.
Photobucket

Photobucket

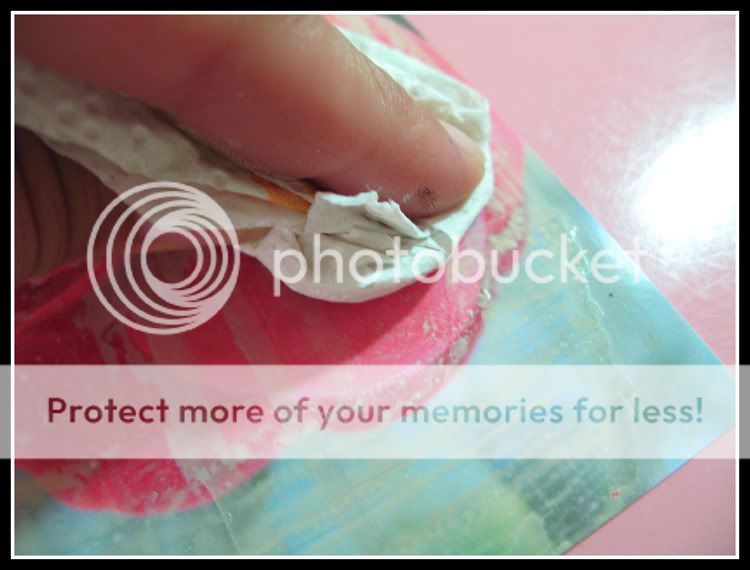
When the paint is dry, you can go back into the photograph and carefully remove any paint with a slightly damp towel in areas where you want the subject to stand out more.
Photobucket

Photobucket

This is fun to do on a black and white photo too...here I tinted my picture of Bonnie with pale pink.
Photobucket

#2 Dry Brushing Editing
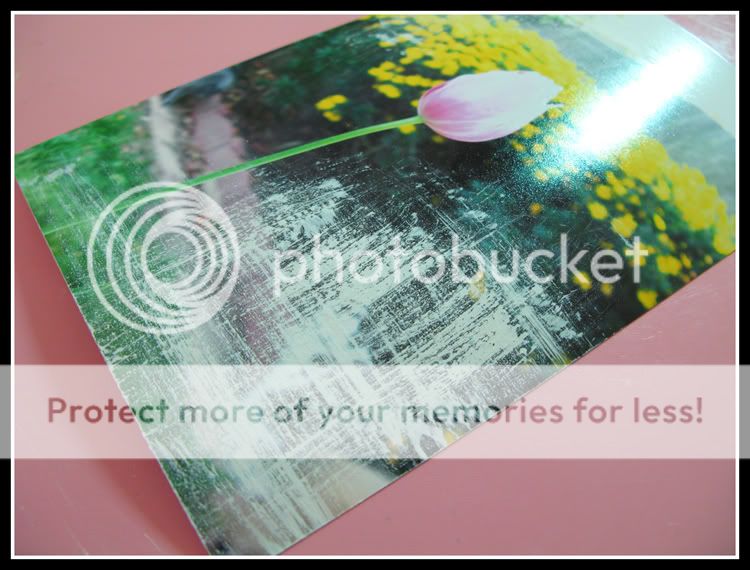
Another quick and easy technique is to dry brush over the top of unwanted portions of your pictures. In this picture the tulip is the subject and the two cats, who wandered into the frame, are going to be edited out.
Photobucket

I used a small amount of acrylic paint and stippled my dry paint brush into it.
Photobucket

Then lightly brush the paint onto the offending part of the picture is a cross-hatch fashion. Use light brush strokes as you can always build up the amount of paint to get the coverage you want.
Photobucket

And now the cats are edited from the photo...
Photobucket

#3 Finger Painting
Finally, I thought it might be fun to see how finger painted photo corners would look…easy enough to try.

Just dip your finger into the paint and swipe two short (or long, your choice) lines at each corner of the photo…
Photobucket

Photobucket

It also might be fun to try polka-dots or small hearts finger painted on the photo...hmm...I may have to run out to the studio and try that...

Try combining the painting ideas, like I did here to really bring the tulip into focus…fun!
Photobucket

And here is a layout I made with my photo of Bonnie...(sorry the scanner is on the fritz, and the layout got a bit cut-off on the right side...but you get the idea).
Photobucket

So was the experiment worth it? Here is the tally:

Cost: $0…we all have acrylic paints on hand, and the cheap stuff works just as well for these ideas.
Fun Factor: Pretty fun
Time: 10-15 minutes, depending on drying time
Skill Level: Basic

So there it is, Fun Photo Painting! Easy Peasy…and Cheap! Cheap!

Friday, July 23, 2010

Frugal Friday: Photo Editing without the Expensive Software

Big

This past week I spent a couple of hours cleaning out my big box-o-photos. I systematically went through and separated out the photos that I will never scrap; pictures that I do still need to scrap and ended up with a nice little pile of photos that were destined for the garbage (don’t panic here, these are extra prints and/or bad pictures).
Photobucket

My little mind began stewing, what can I do with these? And I came up with a few ideas to share with you.

Because there are so many ideas…I am going to break them out over the next several weeks, but this is what you can expect:
Distressing Fun
Water Fun
Doodling Fun
Colorizing Fun
Painting Fun
& Shaping Fun

Think of it like photo editing without the expensive software…and I promise, 99.9% of the supplies needed will already be in your stash of tools!

One word of forewarning, these ideas and techniques will permanently alter your photographs. Do not, I repeat DO NOT try this on any photos that are one of a kind, without negative or digital back-up or are antique photos. If you would like to use an antique or one-of-a-kind photo, I suggest you scan them and reproduce them, using the reproduction to play with. This probably seems really logical; I just feel better stating it before we start…

This week I am going to start off with Distressing Fun!

These are few tried and true techniques that I use quite frequently, both in my editing software and on printed photos. In my software program these are action such as vintage photo, antiqued, old paper, edge burn among others.

Each technique can be done subtly or over-the-top! Your choice, just have fun and experiment!

1st: Distressing Edges
There are a couple of ways to accomplish this technique. The easiest and cheapest way is to use the edge of a scissor blade. Please be careful trying this.
Photobucket

Simply open up the scissor blades and gentle running the photo edge along the blade, in one direction, repeatedly. The more pressure you use the quicker the edge will fray.

Photobucket
But too much pressure may tear the photo…but hey, that’s a neat look all on its own!

Photobucket
There are a few distressing tools on the market; Tim Holtz/Tonic Studios Paper Distresser ($5.50); the Stampin’ Up Cutter Kit (comes with additional tools for $19), the Heidi Swapp Distresser and the Zutter Distrezz-it-All ($40).

The Tonic Studio, Stampin’ Up and Heidi Swapp distressers work in pretty much the same way.

Photobucket
Simply place the photo in the slots and run the internally housed blade along the edge repeatedly. To achieve a more worn look, try running the blade back and forth along the photo edge…

The Distrezz-it-All is a small electric machine that runs a cylindrical blade similar to a pencil sharpener.
Photobucket
The photo is placed in the opening and distressing magic takes place.

2nd: Sanding
I love sanding the edges of my photos. It really gives a neat effect and again, can be done subtly or not so subtly. There are several scrapbooking produced products on the market.
Photobucket

I personally have both the Precision File Set by Basic Grey ($6.99) and Tim Holtz’s Sanding Grip ($5.99). I prefer the sanding grip, but found that a simple piece of sanding paper from the garage works just as fine. There are several grits of sanding paper from super fine (1000) to extra coarse (24), but if you need to purchase it for scrapbooking, just buy the cheap stuff which is usually labeled ‘fine’, ‘medium’ or ‘coarse’.

For sanding, start slowly and run the sandpaper along the edges of the picture.
You will achieve a different look by sanding parallel with the edge
Photobucket

or in a circular motion.
Photobucket

I generally try to round the corners,
Photobucket

but sometimes I leave the corners cross-hatched.
Photobucket

Occasionally I find that with the home printed pictures I will actually accidentally lift off some of the printed image…just go with it…have fun and make it work (or re-print the picture and start over, your call)
Photobucket

3rd: Inking
I generally use Tim Holtz Distress Inks ($5) for inking on my pictures; Distress Inks stays wet a bit longer are transparent and can be quite subtle, depending on the color.

You can ink over the plain edges of your photo, using either the ink pad...
Photobucket

Photobucket

or an ink blending tool ($5), this is similar to an “edge burn” in photo editing software.
Photobucket

Photobucket

Or achieve a very vintage look by inking over the distressed edges
Photobucket

or sanded edges.
Photobucket

If you don’t have any Distress Inks on hand, try using a chalk ink like Clearsnap’s Cat’s Eye Fluid Chalk Ink ($2) or Tsukineko Versamagic Dew Drop ($2.50). The chalk inks are more opaque on the surface of the photo, but the end result is very similar.
Photobucket

Photobucket

If you are thinking that these distressing techniques are too much for your everyday layouts…take a look at the samples below, both layouts have distressed picture edges but the subtlety of the distressing makes them fit right in on the traditional layouts.
Photobucket

Photobucket

Or for something a bit more artsy…here is an over-the-top distressed picture…a layout destined for the wall above my nightstand. (This layout is still a work in progress…)
Photobucket

So was the experiment worth it? Here is the tally:
Cost: Varies…I have all of these items on hand…and I bet most of you have them on hand too, otherwise I tried to list the prices above. But it still beats the cost of editing software ($80 - $700)
Fun Factor: Super…one of my favorite things to do!
Time: Not too long, but there may be a learning curve. I got all of these samples (excluding the layouts) done in about 30 minutes…
Skill Level: Intermediate

So there it is, Fun Photo Distressing! Easy Peasy…and Cheap! Cheap!

And remember to check back next week for Water Fun!

Monday, July 19, 2010

Camp Scrap Week 3....

So Week 3 of Camp Scrap has come to a close (actually it closed last Wednesday....I'm a bit late posting this)...and everything has been so hectic, I'm falling a bit behind!

Anyway...on to the assignments...


Thursday's Email: Ali Edwards' Digital Layout
I didn't make my layout digital, just plain ole paper and embellies...I like the feel of paper too much to turn digital...love this simple layout, though, and finally got to scrapping these pictures which have been hanging around for a few years...waiting for inspiration (or time???).


Friday's Email: Sketch
Christmas 2009...I used my Silhouette to cut the Christmas tree and jingle bells...love this paper line from Basic Grey, I think it is called Dasher...or maybe Figgy Pudding...can't remember...I really should write these things down...


Saturday's Email (homework on Saturday?!?!?): Sketch
More Christmas 2009...this sketch was a double-play on Friday's sketch. It is one of Fridays pages turned 90 degrees...

I'm still ruminating on Monday's assignment...I think I might try to dig out some old un-scrapped pictures from a few years ago...
Monday's Email: Recipe

In progress...that's my story and I'm sticking to it!
Tuesday's Email: Artistic Idea


Wednesday's Email: Journal Prompt ("now & then")
Pictures of our Rooster Cogburn from July 2009 when he came to live with us and July of this year. He has definitely grown in the past year, he's 11 lbs...but still so tiny compared to Bonnie and Clyde!

So that is Week 3 in a nut shell!

I did go back and finish a layout from Week 2 that I had skipped.


Week 2 Wednesday Email: Journal Prompt
The prompt was to scrap a layout of someone you love...that was a hard choice, but in the end Daisy (who I really miss) won out. This is a really old photo that I do not have the negative for, and the scanned image is so bad that I can't make it very big...I played around a bit with doodling on the page, so it would be fun and funky...just like Little Miss Daisy May!

So we are currently in the middle of Week 4...and I am pretty much on track with these projects...all in all, including this weeks assignments, I have five layouts to finish (one from Week 1, two from Week 3 and two from Week 4).

Tonight I plan on diving into my big ole box of pictures to see whats left in need of scrapping...there should be some oldies but goodies in there...

I recently cleaned/organized all my scrap supplies, but have been dreading going through te box of photos...I guess there is no time like the present...just bite the bullet, put on some good old Louis Prima tunes, grab a Venti Iced Americano and get her done!

Maybe I can even take a picture or two and scrap the project....

Or is that just another crazy idea!

Friday, July 9, 2010

Frugal Friday: Foam Mounting Tape

Big
Pop Dots…what is there to say about Pop Dots…if you love them, then you use them a lot…I mean a whole lot.

I love them.

A lot.

I mean a whole lot!

I used to buy All Night Media’s Pop Dots, but found that I was going through the packages like they were free! I even cut up the ‘left-over’ bits after all the dots were punched out…inevitably, though, I would find I was always out of them. And of course that means a quick trip to Michael’s…which was never for Pop Dots alone…know what I mean…wink-wink!

So, being frugal, I thought there must be a better alternative.

I have since switched from small packages of pops to a ginormous roll of Scotch Mounting Tape; more for the convenience of have large quantities on hand than the price since the roll,$35.99 from Staples, is a bit of an investment.
Photobucket

Curious about the overall cost, I did a little online searching and came up with the following price comparisons (I am guesstimating to the best of my mathematical abilities on the actual square inch of product in these packages…bear with me here):

EK Success 3D Dots: approx. 27 square inches of foam for $1.99/pkg = ~$0.074/square inch

All Night Media Pop Dots: approx. 40.5square inches of foam for $2.79/pkg = ~$0.069/square inch

Scrapbook Adhesives 3D Foam Squares: approx. 64square inches of foam for $2.99/pkg = ~$0.047/square inch

Scotch Mounting Tape (ginormous roll): 1,026 square inches of foam for $35.99/pkg = $0.035/square inch

Scotch Mounting tape also comes in smaller rolls and they run between $0.056 to $0.087 per square inch…so in their case, the ginormous roll will definitely save you money in the long run.

The cost comparison showed that, the Scotch rolls aside, Scrapbook Adhesives Foam Squares (from JoAnn’s) is the best value…but I am still sticking with the Scotch ginormous roll, since in addition to the lowest price per square inch, the convenience of always having it on hand is invaluable.

The biggest difference between the package squares and dots is that you will need to cut the foam tape yourself. I use plain-jane everyday kinda scissors for this, and haven’t found that any residue is left behind on the blades. The foam tape cuts cleanly and you can cut a strip as small or as large as you need it. I tend to prefer a complete strip along the edge of my popped pieces, rather than small squares at the corners, as you would have to do with the pre-packed pieces…so for me, that is another benefit.

Here is my roll…after two months of use…you can see the outline of the full roll beneath my roll...
Photobucket
Hardly a dent in it...I think this will last me all year!

Photobucket

And here is a layout I did with the mounting tape…
Photobucket

Here you can see how the small frames at the corner are lifted to different heights depending on the number of mounting tape layers I used...
Photobucket
(Yep...those are homemade dew drops in there...)

Photobucket

Here is another layout, still in progress, where I am building layers with the mounting tape...
Photobucket

Photobucket

So was the experiment worth it? Here is the tally:

Cost: A ginormous roll of Scotch Mounting Tape cost $35.99 from Staples or about $0.035 per square inch.
Cats Annoyed: 0 (saving money leaves more cash for cat toys and treats!)
Time: Not really an issue here…
Skill Level: Basic

So there it is, bulk mounting tape! Easy Peasy…and Cheap! Cheap!