Friday, April 30, 2010

National Scrappbook Day Blog Hop...and Other Fun "The Everyday Scrapper" Stuff!

Welcome to Catinthegrass, if this is your first time visiting…I hope you come back often….and if you’re an old-time regular, thanks for stopping in again, glad to see you!

I am stop #7 on The Everyday Scrappers’ National Scrapbook Day Blog Hop!

If you came here first, be sure to start at The Everyday Scrapper and visit all the Hop-stops, leaving a comment on each blog, and ending back at The Everyday Scrapper for your chance to win!

Blog Hop Itinerary

Start Here: The Everyday Scrapper

1. Catherine

2. Anneliese

3. Lisa

4. Tabitha

5. Sharon

6. Ann

7. Christine [YOU ARE HERE!]

8. Juliann

9. Joan

10. Jennifer P

11. Mia

12. Monique

13. The Everyday Scrapper


I am including a give-away for those of you that become a follower of my Blog and complete the mini project tutorial. Just come back here by May 8th, and leave a second comment on this post with a link to a picture of your completed mini and I will choose a winner, at random, to receive a special mini book, made by me…


Or, for those of you who would like, you can post a picture of yo
ur completed mini on The Everyday Scrapper forum, here: Catinthegrass Challenge, just be sure to leave a comment letting me know where to find your mini!


Prize: mini travel album (5 1/2" X 3")

Now on to my tutorial…

Lately I have been on a mini-book/album kick and am really enjoying finding projects to make and give-away that use up my stash. This tutorial is a mini-pocket album that I came up with which uses only a few supplies that I know we all have lying around…

The finished dimensions of the mini are 4” X 3”, and each internal pocket is perfectly sized to slip in ATC cards, gift cards or small school pictures.
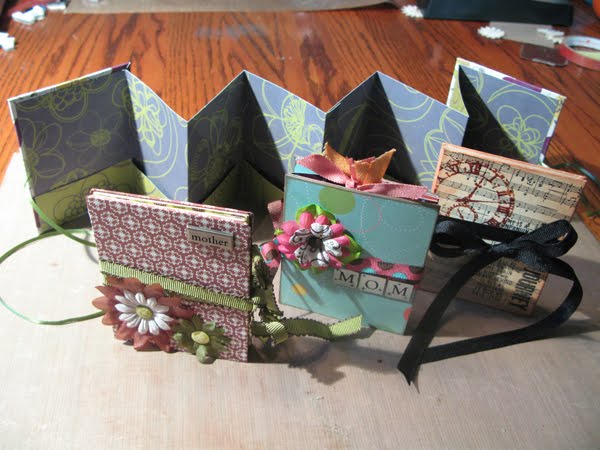
Materials List:

1 piece 12X12 patterned paper (double-sided and heavier weighted)

Glue (Aileen’s, ZipDry or Glue Stick)

Double-sided tape

Bone Folder (or butter knife – no sharp edge)

Paper cutter

Ribbon (2 pieces 18” each)

For covers:

Chipboard scraps and thin weight patterned paper scraps

1) Cut the 12X12 patterned paper into three pieces, as follows:

Cut two pieces that measure 12” X 5¼”

Your remaining piece will measure 12” X 1½”

2) Fold the two 12” X 5¼” pieces as follows:

a. Fold in half and crease with a bone folder. To make sure the fold is even; I line up the edges to my fingernail and creasing in the center of the fold, and then run the bone folder up and down the crease.

b. Take the top flap and fold it back on itself, lining up the fore edge with the center fold, again creasing in the center first and then running the bone folder up and down the crease.

c. Turn the section over so the second fold is now on the bottom, and fold the top flap back on itself, lining up this fore edge with the center fold, again creasing in the center first and then running the bone folder up and down the crease.

You now have one section of the accordion folded, when viewed from above it should look like the letter “M”.

d. Repeat these folds with the second piece of 12” X 5¼” paper. You now have 2 letter “M”s.

3) Using the remaining 12” X 1½” piece of your paper, cut one piece that measures 5¼” X 1½”, this will be the hinge that will connect the two “M” sections of the accordion.

4) Fold the hinge piece in half length-wise.

5) Apply adhesive, I used double-sided tape, to the inside of the hinge fold, the valley side. Place the two accordion sections in front of you so that they make two letter “M”s. Adhere the hinge to the fore edge of the two flaps that are in the middle.

6) Unfold the long accordion (now 24” X 5¼”) and mark a score line 1¼” up from the bottom.


7) Fold this section up and crease along the score line. Apply adhesive, again I used double-sided tape, at each end of the pocket making sure to adhere no more than ¼” of the edge.

8) Re-fold the accordion along the vertical fold lines. This may take a bit of re-creasing as the pocket portion of the accordion will now be folded in the opposite direction. Set the accordion to the side and let’s make the covers.

9) Cut two chipboard pieces 3⅛” X 4⅛”, and two pieces of patterned paper, for covering the chipboard, 4⅛” X 5⅛”.

10) Apply adhesive to the backside of the patterned paper and center the chipboard on the paper, making sure you have an equal ½” turn-in on all four sides. Trim a 45˚ angle at the four corners, leaving a scant 1/16” over-cut.

To adhere the patterned paper to the chipboard I used Lineco Neutral pH Adhesive (it has a low water content), but a glue stick, Aileen’s Tacky Glue, Modge Podge, or ZipDry will work. Avoid using Elmer’s white glue, as the high water content will wrinkle your patterned paper and really warp your chipboard. (Some warping is to be expected and can be rectified by placing the covers under heavy objects while they dry.)

12) Fold over the turn-ins on the top and bottom of the chipboard. Using your bone folder press down the scant 1/16” over cut at all four corners and then fold over the remaining turn-ins at the sides.

13) Cut the ribbon into two equal pieces, 18” long, and adhere to the inside of the covers; I used double-sided tape.

14) Lastly, apply adhesive to the first flap of the accordion and adhere it to the cover, centering it so that there is 1/16” overhang on all sides. And repeat for the back cover.

15) Wrap the ribbons around the mini twice so they meet back at the fore edge and tie.

Special thanks to my friends, foxyscrappr (brown and green mini sample) and scrappingdrgn (blue and pink mini sample), for testing out my instructions!

Well, I hope you enjoyed this…and are going to make one for yourself. Remember, come back here to this post by May 8th and leave a comment saying that you finished the project (and feel free to include accolades on how great the tutorial was…LOL) and leave a link to where your mini’s picture is posted! I really look forward to seeing what you have created!


And here is a quick note from Catherine at The Everyday Scrapper...


Since no National Scrapbooking Day is complete without some SALES.... we are also hosting our very first TES Scrapbooking Online Party through Ann's MemoryWorks website, where you can pick up LOADS of awesome supplies at great prices!

Photobucket

Here's the best part: if you buy anything through MemoryWorks during our party, which will run May 1st-12th, leave a comment on your MemoryWorks order saying it's for TES party, and you'll earn extra entries towards the grand prize drawing! Want to see the prize?!!

Photobucket

Spend:

$1- $10: Earn 1 extra entry

$11-$20: Earn 3 extra entries

$21-$30: Earn 5 extra entries

$31-$40: Earn 7 extra entries

$50 & up: Earn 10 extra entries into the draw!

Sounds good?! I think so!!! The prize is just too yummy to pass up!

Photobucket Click to get shopping!

Rainbows...and Other Beautiful Sights


I have been working on this layout for a while now...thinking; planning; deciding; and final, this past weekend, completing! I took this picture after a long rainy day; as I was driving home after work the rainbow was shining brightly across the street from my house. I must have taken twenty pictures, from all angles (including the one I used, from the upstairs bedroom window!) until the rainbow started to fade...I wanted to do a crisp clean layout, but with a bit of grunge to it...and so I cut eight bird shapes with my silhouette and glued them on top of each other and tried to fray out the edges after using Glimmer Mist to get it wet. I'm more of less happy with the bird, even though it didn't turn out exactly as I imagined. I think I will definitely try this technique again.


Here are a few other pictures I took that evening...I don't have plans for them yet, but I am sure they will end up in some project!


(Hi, I'm Clyde...aka catinthegrass)


Be sure to come back tomorrow...I have a fun tutorial being posted for National Scrapbook Day and The Everyday Scrapper's Blog Hop...see you then!

Thursday, April 15, 2010

Envelope Mini Album...and Other Tracy's Treasures!

Here is another fantastic video tutorial from Tracy at Tracy's Treasures....I love her blog and so look forward to reading about her days (it's kinda like spying on your neighbor...) and the bonus to spying on her and her family, is every so often she has a great video of some cool little mini album!

This mini album is super easy, just three envelopes, some pretty paper and embellishments a little glue....and voila! In a couple of hours I whipped out this neat little mini album for my friends 13th birthday (okay...really I hemmed and hawed, bought paper, hemmed and hawed some more and then a month and a half after she turned 13 I whipped out the mini...at least I finally got it done!)

So here are pics and info on the mini I did, but be sure to watch the video first for all the how-to instructions....


Here is the front of the mini, I used three #10 envelopes (because I had a stack of them close at hand, but I think any envelope would work). All the papers I used were from Rusty Pickle's Candy Land line (so sad to see RP go out of business, they have great papers!) and my embellishments and die-cuts were made on my Silhouette.


Here is a top view of the mini opened up, the left and right 'top wings' of the mini are each one envelope and the 'bottom wing' is the third envelope...remember to watch the video and then this will make more sense. I sealed and then cut my envelopes so they were 4" tall (bottom of the envelope to the top of the envelope).

These pics are from one of the tri-fold sides (you will have two tri-fold side to the mini)
(See Rooster there, he was very interested in the pictures I was taking, and wants a mini of his own now...)


The paper measurements for each of the tri-fold sides are:
Left long piece: 4 1/2" X 3 3/4"
Middle pocket: 3 3/4" X 5 1/4" (fold the bottom up 1 1/2" for the pocket)
Right short piece: 3 3/4" X 3 3/4"
Outside-right short piece: 3 3/4" X 3 3/4"
Spine piece: 1/2" X 3 3/4"
(Now remember to cut two of each of these, as you will need them for the other tri-fold side)


Here is one of the tri-fold sides opened, with all the goodies pulled out.

Since the envelopes were sliced open on the top, they make pockets for goodies. Here are the insert sizes for the entire mini...
Big envelope pocket: cut four 4" X 4 1/4"
Small envelope pocket: cut two to four pieces 3" X 5" (I cut mine with rounded corners and punched a hole in the top to make a tag with ribbon)
Small inside pocket: cut two 2 3/4" X 3 1/2"(On this mini, I actually used small flower micro-mini albums instead of the insert, I cut the micro-minis on my Silhouette from one of their purchased shapes)
Big inside pocket (we haven't cut this yet, it comes in the next step): cut two 3 1/2" X 3 1/2"


This is the back section of the mini. This is where the 'big inside pocket' inserts go...

The paper sizes for this section are:
Left and right pockets: 4 1/2" X 5 1/4" (fold the bottom up 1 1/2" for the pocket)


And here is a picture of the back section and all of it's goodies...

And lastly, the front and back cover papers: 4 1/2" X 3 3/4"


Now, as for a closure to the mini, I used ribbon...I punched a small hole on the edge of the front and back covers (you can sort of see that in the pic above)...I slide in and adhered the ribbon to the inside of the envelope. Make sure your ribbon is long enough to wrap around the mini and tie on the opposite side, since the mini opens on the front and the back.

Hopefully these instructions were understandable...I haven't had a full cup-o-joe yet, and my allergies are making everything a bit hazy...I understand what I am trying to say...right? Wait, let me go get another cup of coffee...

Anyway, I hope you try this out...it was fast, easy, super cute and a great way to use up scraps!

Tuesday, April 6, 2010

March Tally...and Other Crafty Things

So March has come to a close (actually...six days ago...) and I finally got around to looking at what crafty things I did this month. Not much..hmm? In my defense...I also spent oodles of time pulling weeds and starting a flower garden and vegetable patch...I do have other hobbies!

I finished:
4 knitted washcloths (I swear I will use ALL of the cotton skeins I bought...even if it breaks my little fingers!)
12 cards (I think I am done swapping cards for awhile)
1 flapper dress (complete with six rows of fringe!)
1 fabric tied basket (the last one for awhile...)
3 flapper headbands
3 scrapbook layouts (not so much scrapping this month!)

The flapper dress and headbands were for a Roaring 20's themed fundraiser for my friend's son's elementary school. We had a blast, and everyone looked fabulous! But I must say...we were the bee's knees!


I volunteered at the Pleasanton Scrapbook Expo two days, and had loads of fun! And the shopping, whew, I did not stick to the low budget this month! But I picked up a few things I had really been wanting and met a lot of really nice people at the vendors booths...a great day, topped off with hours upon hours of scrapping with my friends (yet I only finished three pages?!?!?)


These are pictures I took at the X Street Antiques fair...


Pictures of what I do....


Picture of my Rusty...helping me knit! (I scraplifted this layout from....I can't remember right now, but I will come back later and give credit, where credit is due...EDIT 4/14/10:here is the original I scraplifted from: Sweet, by...okay, I tried, but I can't find the artists name...sorry, all I know is she designs for Crate Paper and has a super cute little girl)

All in all, a great month...and a wonderful start to the gardening season!

Friday, April 2, 2010

Here it is...as promised

I finished up the "Ladybug Season" layout on the 18th of March, when I spent a wonderfully relaxing days with my girlfriends at the Pleasanton Scrapbook Expo...and here it is...


I love how the title turned out, cut from the same paper as the background (an idea I got from Silhouette's blog - Love them!)

And the pictures are just what I wanted...thanks Mother Nature (sorry, she doesn't have a blog, that I know of)...

And the paper flowers...here's a close-up...


I learned how to make from The Everyday Scrapper blog....mine aren't nearly as nice as Jennifer's, but they get the job done!

Wednesday, March 31, 2010

Weeding...and Other Super Fun Things!

Our yard is constantly attacked by weeds. We live next to a big cow pasture in one of the windiest areas of California. It seems that by the time we make it around the yard (front, back and side) and pull all the weeds...they are already popping up again. We get all kinds of weeds; low amaranth, little bittercress, California burclover, spurweed, bermuda buttercup, mousear chickweed, white clover, common cocklebur, dandelion, fiddleneck, cutleaf geranium, common groundsel, horseweed, tumble mustard, bristly oxtongue, scarlet pimpernel, broadleaf plantain, buckhorn plantain, annual sowthistle, creeping spurge, Canada thistle, large crabgrass, prarie cupgrass, goosegrass....and my all time favorite, Blessed Milkthistle (silybum marianum).


Blessed Milthistle, such a nice name for such a horrifying noxious weed. According to Wikipedia (the modern-age encyclopedia of everything...if its there, it must be true!), Blessed Milkthistle has been grown as a medicinal plant in monestarial gardens since ancient times...and more recently, the extract is now also being used in Rockstar Energy Drink as an energy enhancing agent. Maybe I should call Rockstar...I have a yard full of this crap they can come harvest, heck I wouldn't even charge them for it, as long as they remove it!

Whenever I see the darling little sprouts of the Blessed Milkthistle...I cringe! I can't even pull the seedlings out with leather gloves on, the thorns are so dang hard. So usually I let it grow a bit and then hack it out of the ground with the shovel and use tongs to pick it up and throw it away! I swear the sight of this weed sends shivers down my spine!

But on Sunday I found the coolest tool at Lowes...the UpRoot® Weed & Root Remover by Fiskars.


I bought one (for about $26) and thought I would give it a try. We have so many weeds and the constant bending, kneeling and pulling is horrible. I actually wore through the fingertips of my gloves a couple of weekends ago on a marathon 5 hour weed pulling session!

But I digress...again...we tried out the UpRoot and were actually stunned by how well it worked! First you jab the tool into the grond over the weed, then you step on the side of the tool and rock to the side, which pulls out the weed...root and all...then, and here is the best part, there is a slide on the handle that you use to forcefully eject the weed off of the end of the tool. I was shooting those damned weeds accross the yard and into the garbage can like I was in the NBA! Okay, maybe a slight exaggeration, but it was fun! So fun, in fact, later that night after watching TV, I was tempted to go outside and pull weeds...for fun...are you getting what I am saying here! This is absolutely crazy!

I sent Fiskars an email Monday morning letting them know how much I love this tool:

“I LOVE this tool...I bought one yesterday and it is so easy to use, and works wonderfully on low braodleaf weeds! Our yard is almost overrun with braodleaf weeds (we live right behind a cow pasture...and the weeds are a huge problem), but this made pulling them out so easy! And no bending or stooping or waddling around on my knees! What a godsend! At 9:30pm last night, with nothing good on TV, I even considered going outside and pulling weeds...it was so fun! Crazy, I know, I never thought I would say I wanted to go weed the yard! I LOVE LOVE LOVE this! Thank you so much! Fiskars are just the best tools...I have a lot of crafting Fiskars, and now won't consider anything less for my gardening tools!”

So...I just wanted to put this out there, for all to see...weeding can be fun! So get to it! You wouldn't want your neighbors to complain....(more about that at a later date!)

PS: The ladybug pictures below are from the weeding marathon....and the ladybug on the bottom right is crawling on a Broadleaf Plantain...actually a very pretty weed I considered keeping in the yard...

Tuesday, March 16, 2010

Ladybugs...and Other Elusive Things

One day while weeding the backyard I noticed ladybugs everywhere. It seemed like it was ladybug season! I was so intent on finishing my yard work, I didn't grab the camera...never got pictures of the little buggers.

And of course for the next several weeks I was on the constant lookout for them...camera in hand...no ladybugs! Little buggers!

Apparently, they only come as a reward for doing yard work, 'cause this Saturday I spent many agonizing hours cleaning our side yard of weeds...and the ladybugs were out in full force!

This time...I had camera in hand!

Here are the fruits of my labor:


I think it was well worth the wait...

Now all I have to do is print, trim and scrap!

(Be sure to click on the above pics...the first one is a cool front view...lots of details)