Tuesday, June 15, 2010

Something Creative Everyday...almost

I wanted to do something creative everyday...that was a goal for 2010.

I doesn't always come to fruition...chores and work quite often get in the way....

But I'm trying...

This past weekend I made time to be in my studio, even if only for an hour, Friday, Saturday and Sunday! It felt great!

I worked on this a bit...that a bit...and even started a couple new projects...

I enjoyed myself!

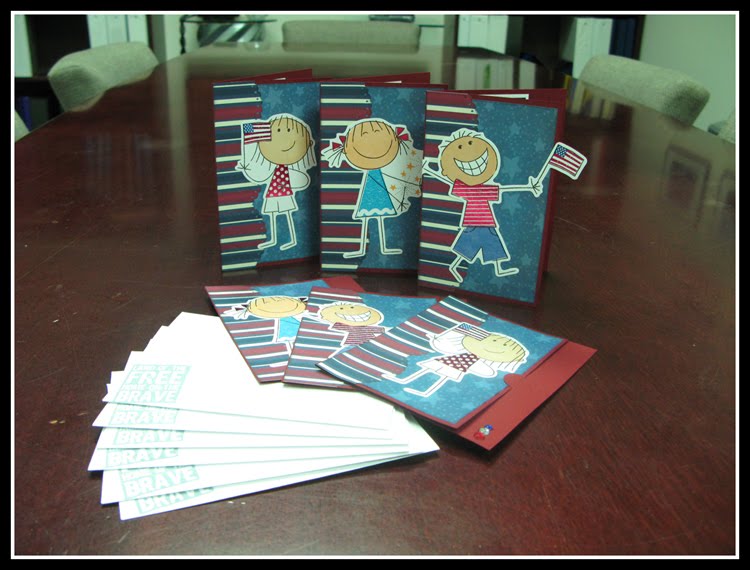
I finished these invitations to a 4th of July party my mom is having...simple and cute!


Complete with matching envelopes...


Tomorrow I will show you the gardening journal I started...and the beginnings of my 2010 Harvest Mini album! (I'm cheering for my veggies!)

Friday, June 11, 2010

Frugal Friday...And More Uses For Sticky Spots

Photobucket

So last week’s post (sticky spots) got me to thinking…a dangerous thing sometimes.

What else can I do with repositionable glue and sticky spots…and my idea…

BLING!

So I set out to see if it would be cheaper and reasonably easy to make my own sheets of rhinestone bling.

You can buy packages of self-adhesive rhinestones, by almost every scrapbooking manufacturer, for anywhere from $1.80 to $4.50…in almost every color imaginable. The most expensive per piece price I found was $0.14/pc (32 pieces for $4.50) and the cheapest $0.03/pc (72 pieces for $1.80). This, of course, was not exhaustive research and doesn’t take into account those wonderful 40% off coupons we all love to use…but is just a general idea of cost, for comparison purposes.

Here is what I did:

Self-Adhesive Rhinestones

I cut a 4 ¼” X 5 ½” piece of release paper (remember, we are keeping these from used office labels and such)

Self-Adhesive Rhinestones

I placed small blobs of Aileen’s Tack It Over & Over in rows on the sheet (36 blobs in all)

Self-Adhesive Rhinestones

I very carefully (and with a bit of frustration) dropped a small rhinestone into each blob. I used a variety of rhinestone sizes.

Self-Adhesive Rhinestones

Now be sure the blobs are VERY small…my first sample row was a bit too large. The glue does dry clear, but the rhinestones don’t set as nice if the glue blob is too big.

Self-Adhesive Rhinestones

And let it dry…

Self-Adhesive Rhinestones

And, it worked! The rhinestones came off of the release paper with no troubles and adhered to my project like a charm!

Self-Adhesive Rhinestones

Self-Adhesive Rhinestones

So was the experiment worth it? Here is the tally:

Cost: I had the Tack It Over & Over and on hand ($0), I fished the release paper from the garbage can ($0), the package of rhinestones was $4.99 for 840 pieces making my per piece price $0.006 (or the sheet of 36, $0.22)

Cats Annoyed: 0 (I must be doing something wrong…why aren’t they hovering around me?)

Time: This is a bit hard to quantify…the blob placing is pretty quick, drying…well a few hours. The longest (and most frustrating part) was getting all the little itty-bitty rhinestones face-up so I could ‘just drop’ them into the glue…argh! Patience is definitely needed here!

Skill Level: intermediate (not too complicated, but patience and a steady hand are a must)

So there it is, homemade bling! Easy Peasy…and Cheap! Cheap!

Tuesday, June 8, 2010

Dog Toys...and Other Fleeting Things

My dogs can destroy the best made toy in under 15 minutes!


Fabric torn, rubber pulverized, stuffing raining down, plastic splintered....


All in record time!


Last week my friend's son gave me an old soccer ball to take home to the demolition monsters...and sure enough in 15 minutes you would be hard pressed to know it was a ball at all.


But it was the best 15 minutes of their lives...to date...until the next new toy comes home!


I


Love


Soccer!

Monday, June 7, 2010

Cherry Harvest...and Other Garden Updates

So this weekend I harvested the first big batch of cherries. I got out a step stool and picked all the cherries I could reach on one of our two trees. The second tree isn't quite ready yet, maybe this coming weekend (or better yet, it would be perfect to harvest for father's day...my dad loves cherries!)


They sure are sweet!


The veggies are doing okay...there are definite signs of slow growth...nothing like my friend's garden, which looks more like a miniature farm!

But the signs are there...


greenbeans


carrots


pumpkin (my original pumkin died...this is a re-plant)


Zuchini (see the squash blosoms...almost ready to open)

And I think I may be able to harvest some radishes soon...with enough summer left to plant some more!


Ain't she sweet?

I finally cleared the ground for the third raised bed, and hopefully I can get that built and placed this week. I have an eggplant that really needs to get in the ground...it is starting to bloom!

With all these pictures, just dying to get printed, I really need to get my Garden Journal finished...maybe tonight...

Friday, June 4, 2010

Frugal Friday

Photobucket

This isn’t a new idea, it’s one I have seen floating around the net for some time, but something I have always wanted to test out…making your own sticky spots (aka Glue Dots). So I located a tutorial (or twelve) printed one out and gave it a whirl…and here are my results…

The most basic instruction is to simply place small blobs of glue on a slick paper and let them dry overnight. The dried glue can then be removed from the paper, as needed, to adhere small embellishments such as flowers and buttons…my big question was what type of glue to use, what kind of paper to use and how can I store them so that I can travel with them to crops.

Sticky Spots
I made sample tests using Aileen’s Tacky Glue ($3), Aileen’s Tack It Over & Over glue ($5), Beacon’s 3-in-1 glue ($4) Beacon’s Zip Dry ($7) and Royal Coat Repositionable Glue ($6).

Sticky Spots
I placed blobs that were about ½” in diameter (or as close as I could get them), which is the size of Glue-Dots that I prefer.

Sticky Spots
I checked for dryness about every ten minutes…the Zip-Dry and 3-in-1 dried in about ten minutes, but after 50 minutes the rest were still wet. I gave up waiting…went to tap class…and checked back in the morning and everything was dried to the touch.

Sticky Spots
The sticky spot winner; Royal Coat Repositionable seemed to work the best and had a consistency similar to real Glue Dots, but a super close second was Aileen’s Tack it Over and Over.

The other glues did not remain sticky at all, so anyway you go it seems that repositionable glue is needed.
Sticky Spots
Zip Dry sample...not sticky

Sticky Spots
Aileen's Tacky Glue...not sticky

Sticky Spots
Repositionable Glue...very sticky!

Sticky Spots
My samples were done on left over paper backing from my Xyron machine (release paper) and on plastic sheets I had laying around which are from Staples and actually meant for report covers.

Sticky Spots
I found the sticky-spots that were on the left-over Xyron sheets were the easiest to remove and use.

Sticky Spots
I had a real hard time getting the sticky spots to even come off of the plastic report covers…which bummed me out, as they were the sturdiest for storage.

I did a quick search online to see if release paper was available for purchase, but only found it in large rolls, I assume for manufacturing uses. But all the “release papers” I saw online said they were silicone coated…if that helps any.

Then I had a brilliant idea, if you work in an office, keep track of those left-over label backing papers…great, another item destined for the garbage that I am going to start collecting…but be sure that if they aren’t coated on both sides, you fold the sheet in half so that the sticky-spots don’t stick to the un-coated side when you stack them…

As for storage…hmmm, that’s another big question, the packaging that real Glue Dots comes on is great for packing in your scrap kit and traveling around with…so how can I do something that will keep them organized and easy to travel with.

Sticky Spots
I decided that since the release paper was the best surface for them, I would trim that to 5” X 6” and store them in a zip lock baggie. I used a sandwich size baggie. Just make sure, since the sticky spots are…well…sticky, that you place a blank piece of release paper over the top, before you put it in the baggie. (yes…you can read into that: “lesson learned”…duh!)

So was the experiment worth it?

Here is the tally:
Cost: I had to buy the Tack It Over & Over and the Repositionable glues, but everything else I had on hand…The Repositionable glue, which worked the best, comes in a pretty big bottle which, I would guess, makes way more than 200 sticky spots, and costs about $6. Glue Dots, the ones I normally buy, come on a roll of 200 and cost about $4 a package.
Cats Annoyed: 3 (I did this experiment out in my studio…at dinnertime!...and they had to wait until after 7pm to be fed!)
Time: Total time for drying was overnight, but the active time was only about 5 minutes of blob placing and maybe 1 minute of paper prepping
Skill Level: basic

There you have it…easy peasy and cheap cheap!

Thursday, June 3, 2010

Typos, Mis-Sizing...and Other Scrapping Disasters

A few weeks ago I came across a really cute 2-page layout on Scrapbooks, Etc.'s website that I thought would be perfect for my Easter pictures. So I printed out the sketch and proceeded to size and print my photos according to the sizes indicated on the sketch. That weekend, at an all day crop, I was devastated (okay...that may be a strong word here...) to find that the original sketch and photo-sizes were for an 8 1/2 X 11 2-page layout...but I pressed on and put the pages together.


I was very disappointed....the pictures are just lost on the pages!

So back to the drawing board...I used MS Excel and re-made the sketch on my own, figuring out the correct photo sizes, so that the overall layout was the same...re-printed my pictures and finally got the pages re-done this past weekend (re-using the original backgrounds...and saving time).


I'm much happier now. And there is even room for journaling (which I'm saving for later!)

Lesson learned: when using sketches from websites, even if the photo sizes are indicated...double check them! Do the math, and save yourself some trouble....

Or better yet, stick to making your own sketches!

Which doesn't always work....

Second story:

I made a little sketch, again using MS Excel, for some cute pictures I took of my cat Rooster on the balcony. I agonized over what sizes to make the pictures, what paper to use, how to embellish and how to edit the photos...so much planning...

I started putting the page together at a scrap over at my friends house...and finished up everything but the journalling...it was turning out great. I have been trying to do more journalling on my pages this year...telling more stories...and doing it in my own handwriting (which can be very messy)...

So I embarked on the journal spot...and not paying attention to what I was doing (or maybe talking too much) I meant to write the word "occasionally"...but somewhere in the room at that exact moment someone was saying the word "additionally"...and yep, that's what got written in the journal spot. I tried to fix it...but to no avail! So in frustration, I set the page aside for a couple of weeks to sulk!

Then last week I used my Silhouette to cut out some butterfly shapes...cleverly hid the 'typo' (or should that be a 'write-o', since I was technically writing...?)...

And here is the fix...

I'm pleased!


The butterflies are three dimensional...I really like them! (But ignore the page warp from painting...I am still working out this issue!)

And finally...here is another quick page I threw together last night (the muse was working...and I had to take her up on it!)

It is based on a Sunday Sketch over at TES...


I'm pleased! I just l-o-v-e the look on my youngest niece's face, holding her fork like a grown-up...ain't she cute! (She's two, by the way...)

It feels good to be pleased with my layouts lately...hopefully I can keep up the flow of work!

Wednesday, June 2, 2010

Sweet Cherries...and Other Signs of Summer!

So I can't say that the veggie garden is a booming success...just yet...time will tell. If we could please have some sun here...maybe they would grow!

But on the cherry front...all is well! I ate my first home grown cherry on Monday...Yumm-y!


From the first day I saw the cherry blossoms...I was salivating!


And then when I saw them hanging there in all their green baby cherry glory...I started to get really excited!


And then this weekend...they were red! And delicious! I could only reach three ripe cherries, but they were the best ever! So I'm off to home now to get out the ladder and pick the rest of the ripe cherries before the birds get them!

And I'm imagining a great cherry page layout here...maybe I will do some sketching and planning tonight, too!